
Common Drywall Problems in Florida Homes and How to Fix Them

How Florida Weather Impacts Plaster
June 18, 2025
Creating Accent Walls with 3D Plaster Molding: Trends for Fall Renovations
November 4, 2025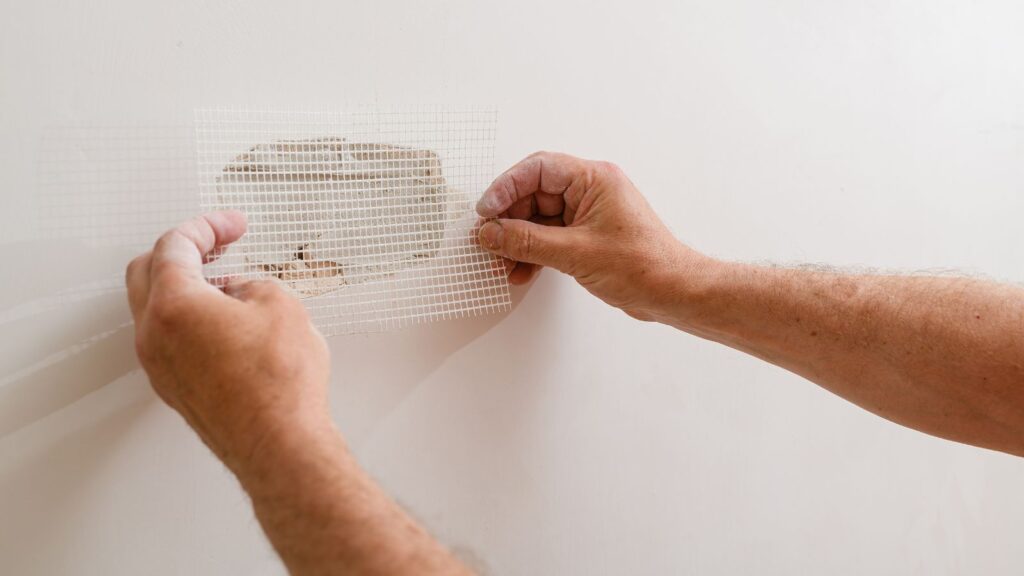
Florida’s wild climate, think high humidity, sudden storms, and wide temperature swings, creates a perfect storm of issues for drywall in your home. In this guide, we’ll walk you through the most common drywall problems Florida homeowners face, how to fix them, and when it’s best to bring in an expert team like United Plastering in Naples.
Why Drywall in Florida Needs Extra Attention
Drywall is a popular choice for modern interiors, but Florida’s subtropical weather means salt air, moisture, and even sandy soil can accelerate wear and tear. When leaks, humidity, or flooding strike, water soaks into drywall fast, leading to stains, swelling, soft spots, and even mold. Left unchecked, these issues aren’t just cosmetic: they can weaken your walls and impact your health.
United Plastering specializes in diagnosing and repairing drywall problems unique to Southwest Florida’s climate, with high-quality materials, precise repair techniques, and a focus on blending patches or new drywall seamlessly with your existing finish.
Most Common Drywall Problems in Florida Homes
1. Drywall Cracks & Settlement Issues
Florida’s sandy, sometimes shifting ground can stress your home’s foundation, leading to cracks in drywall, especially at the corners of doors, windows, or along seams. Hairline cracks usually signal normal settling, but larger gaps or horizontal lines might mean bigger structural trouble.
How to Fix:
- Remove loose debris
- Apply mesh tape over the crack
- Use joint compound to cover, sand smooth, then prime and paint
If cracks keep coming back, your foundation may still be moving. Keep an eye out and consult pros for wide or growing cracks.
2. Holes and Dents
From doorknobs to moving furniture, accidents happen. Small holes (under ½ inch) can be filled with spackle, while larger gaps often require cutting a patch to size, securing it, and following up with taping, mudding, sanding, and painting. Dents just need joint compound and a little TLC.
United Plastering handles repairs from the tiniest cosmetic dents to large holes, ensuring the finished surface matches your existing texture so your wall looks brand new.
3. Nail Pops
Rising humidity in Florida can cause wooden studs to expand and contract, pushing nails or screws outward (creating “pops” or bumps). These unsightly spots can also crack surrounding paint.
To repair: Drive a drywall screw into the stud 2 inches from the pop, then cover both with joint compound, sand, and repaint. Prevent future nail pops by using screws, not nails, and maintaining balanced indoor humidity.
4. Water Damage
High humidity, roof leaks, and plumbing accidents can soak drywall, leading to stains, warping, crumbling, or even collapse. Quick intervention is a must to prevent mold. If the drywall is soft, swollen, or musty-smelling, it needs to be replaced.
Steps:
- Stop the source of water
- Remove wet or soft drywall back to the studs
- Dry the area thoroughly (fans/dehumidifiers)
- Inspect framing for mold or damage before replacing drywall
- Install new drywall, then tape, mud, sand, prime, and paint
United Plastering uses moisture-resistant drywall in vulnerable areas like bathrooms and kitchens to prevent future issues.
5. Mold Growth
Mold is a sure sign of ongoing moisture. It can appear as fuzzy, slimy, or discolored patches, often paired with a musty odor. Mold poses health risks and can hide inside walls if water damage is severe.
For small, surface mold: Remove damaged drywall, dispose safely, and treat exposed studs with antimicrobial products. Bigger infestations? Call professionals. The best defense is keeping humidity below 50% and fixing leaks as soon as possible.
United Plastering Drywall Services in Southwest Florida
United Plastering offers a full suite of drywall repair, patching, and installation services in Naples and surrounding Southwest Florida communities, tackling jobs of all sizes for both residential and commercial clients:
- Drywall patching (small cracks, holes, and dents)
- Full drywall section replacement after water or impact damage
- Texture blending to match existing finishes. Knockdown, orange peel, skip trowel, or ultra-smooth finishes
- Water-damage and mold remediation: removal, replacement, and moisture-resistant upgrades
- Interior drywall demolition and removal for remodels or renovations
United Plastering also offers popcorn ceiling removal and refinishing, restoring your home’s look by updating outdated ceiling textures.
Repairing Drywall: DIY or Call a Pro?
DIY is usually fine for:
- Tiny nail or screw holes
- Shallow dents
- Hairline cracks
But if you notice:
- Big holes (more than 1 inch across)
- Recurring cracks or large wall cracks
- Water stains, bulges, or spongy spots
- Mold growth (especially larger than a handprint)
- Multiple nail pops in one area
…it’s time to call a trusted drywall contractor. Experienced pros like United Plastering can investigate the root cause (foundation issues, persistent leaks, etc.), use the right moisture- or mold-resistant materials, and guarantee a flawless finish that stands up to Florida conditions.
What Makes United Plastering Stand Out?
- Local expertise: Serving Naples and the Gulf Coast since 1981
- Comprehensive services: From minor repairs to remodels and custom drywall features
- Attention to detail: Texture matching, Level 5 finishes for luxury spaces, and care in protecting your interiors during every project
- Residential and commercial experience: Single rooms to entire buildings, they handle it all
- No job too big or small: Every job is approached with skill, precision, and old-world craftsmanship
How to Get Started
If you’ve noticed drywall problems in your Florida home – cracks, stains, soft spots, or bumps – don’t wait. Left alone, these issues can escalate into far more expensive repairs, and in Florida’s climate, time is of the essence.
United Plastering provides free estimates, clear recommendations, and a schedule that works for you. Whether you need a quick patch, major drywall replacement, or want your ceiling modernized, their team has you covered. Contact United Plastering to protect your home’s value, and keep your walls and ceilings flawless.
Frequently Asked Questions
How can I effectively repair a water-damaged section of drywall?
Don’t bother patching water-damaged drywall, it needs to go. If moisture levels are above 17%, the drywall’s shot and won’t hold a repair.
First, stop the leak. Then cut out the soggy drywall with a utility knife, making nice, clean edges. Check the studs behind for mold or water damage and let them dry out fully before you put up new drywall.
Measure and cut a replacement piece, screw it to the studs, tape the joints, and finish with compound. Once it’s smooth and dry, you’re good to prime and paint.
What is the best approach to fix drywall cracks without them reappearing?
Florida’s seasonal humidity changes cause drywall to expand and contract, so flexible repairs really matter if you want the fix to last. Standard tape just doesn’t cut it when things keep shifting.
Mesh tape bends a bit better than paper tape, which helps with cracks that seem to come back. It’s best to wait for stable conditions, around 70°F and 40% humidity, so everything sticks well.
Settlement cracks can mean the foundation’s on the move. Cracks wider than 1/16 inch or running horizontally might be a sign of bigger, structural issues and probably need a pro to check things out.
For repairs, scrape out any loose bits, stick on mesh tape, and go with a few thin coats of joint compound. Keeping indoor humidity between 30-50% helps keep cracks from sneaking back in.
Is there a difference between patching a drywall hole and a drywall dent?
Yep, there’s a difference. Holes need some kind of backing or patch for support, while dents just need filler. For tiny nail holes, you can usually just dab on some spackle, no extra steps.
Bigger holes call for mesh patches or some backing to hold the compound. Dents, on the other hand, are usually from something bumping the wall and just compressing the surface, not punching all the way through.
Small holes with raised edges need a quick sanding before you fill them, or you’ll end up with a bumpy finish. Dents might take a couple coats to build up the low spot.
Really, it comes down to size and depth. Anything bigger than a nail needs a patch. Dents less than 1/8 inch deep? Just fill them and move on.
What steps should be taken to safely remove and prevent mold on drywall?
Mold’s a pain. With drywall, you’ve usually got to cut out the affected section. Just cleaning the surface won’t do much. If the problem’s widespread or you even suspect hidden mold, it’s probably worth getting a pro involved.
Gear up with an N95 mask, gloves, and eye protection before you start. Seal off the work area with plastic sheeting to keep spores from spreading all over your house.
Cut at least 12 inches beyond where you see mold, just to be safe. Bag up all scraps in plastic and toss them properly.
To keep mold from coming back, you’ve got to control moisture. Keep humidity under 50%. Good airflow in bathrooms, kitchens, and laundry rooms makes a big difference.
What are the standard practices for fixing drywall nail pops in Florida homes?
Nail pops happen when fasteners loosen up from the studs, usually thanks to all the humidity and wood movement. The fix? Take out the loose nail and secure things right.
Drive the popped nail below the surface or just pull it out. Then, put a new drywall screw about 2 inches away, making sure it bites into solid wood.
Sometimes you’ll spot screw depressions if the drywall paper swells during humid spells. If you’re seeing a bunch of nail pops, it could mean there’s a bigger moisture or movement issue going on.
Cover the spot with thin layers of joint compound, let it dry, sand it smooth, and then prime and paint to blend the repair in. With a little patience, the patch should disappear.
United Plastering in Florida
Specializing in interior and exterior finishes including: Stucco, hardcoat, drywall, plaster, cornice, metal framing, and decorative work. Homeowners searching for united plaster services in Southwest Florida continue to choose United Plastering for quality results and lasting finishes.
At United Plastering, we specialize in protecting and restoring plaster in Florida’s most demanding climates. Whether you’re dealing with surface cracks, moisture damage, or full exterior restoration, our team has the expertise and tools to preserve the integrity and beauty of your walls.
Contact us today for an inspection or maintenance consultation, and let’s keep your plaster looking flawless, no matter what Florida throws at it.